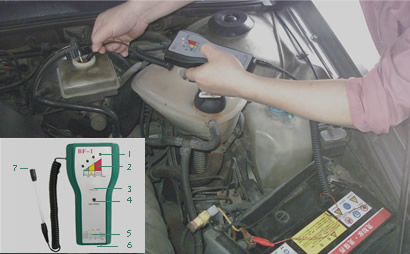
Panel Illustration:
1.Indicator
2.Water content
3.Work button (PUSH ON button)
4.Fine tuning
5. temperature-resisting curve
6. DC input socket
7. Probe |
|
How To Use
1. After cleaning the probe, put it in dry air or
immerse it into new brake fluid.
2.Press down the work button for 3-5 seconds
continuously,
and then turn the fine tuning clockwise until the second
green indicator lights on, and then turn the fine tuning
counter-clock wisely until the green indicator put out.
Now it can be used to test brake fluid.
3.Immerse the probe into the brake fluid, and press down
the work button for a few seconds, then you can judge
the brake fluid state by indicator light.
*All the green light indicate the brake fluid is fine,
the water content is below 0.5%
*Yellow light indicates the fluid is not so good, the
water content is above 0.5%, you can choose to change
brake fluid.
*Red light with buzzer sound indicates the brake fluid
is very bad, waste content above 2.5%, the brake force
decline seriously, and brake fluid should be changed!
4.Please clean the probe and reset the instrument after
testing.
★Warning:
The four indicators twinkle simultaneously with buzzer
sound, it means the battery power is low, and the
battery need to be changed.(voltage:9v). Or powered by
the automotive battery(12v) through DC input socket(12v) |
|
|